Cloudflare can be used purely for their DNS Zone. Although they offer a variety of other services, we mainly use it for the DNS Zone, since it allows us to easily see or modify any DNS Records, as well as share access to it with clients.
[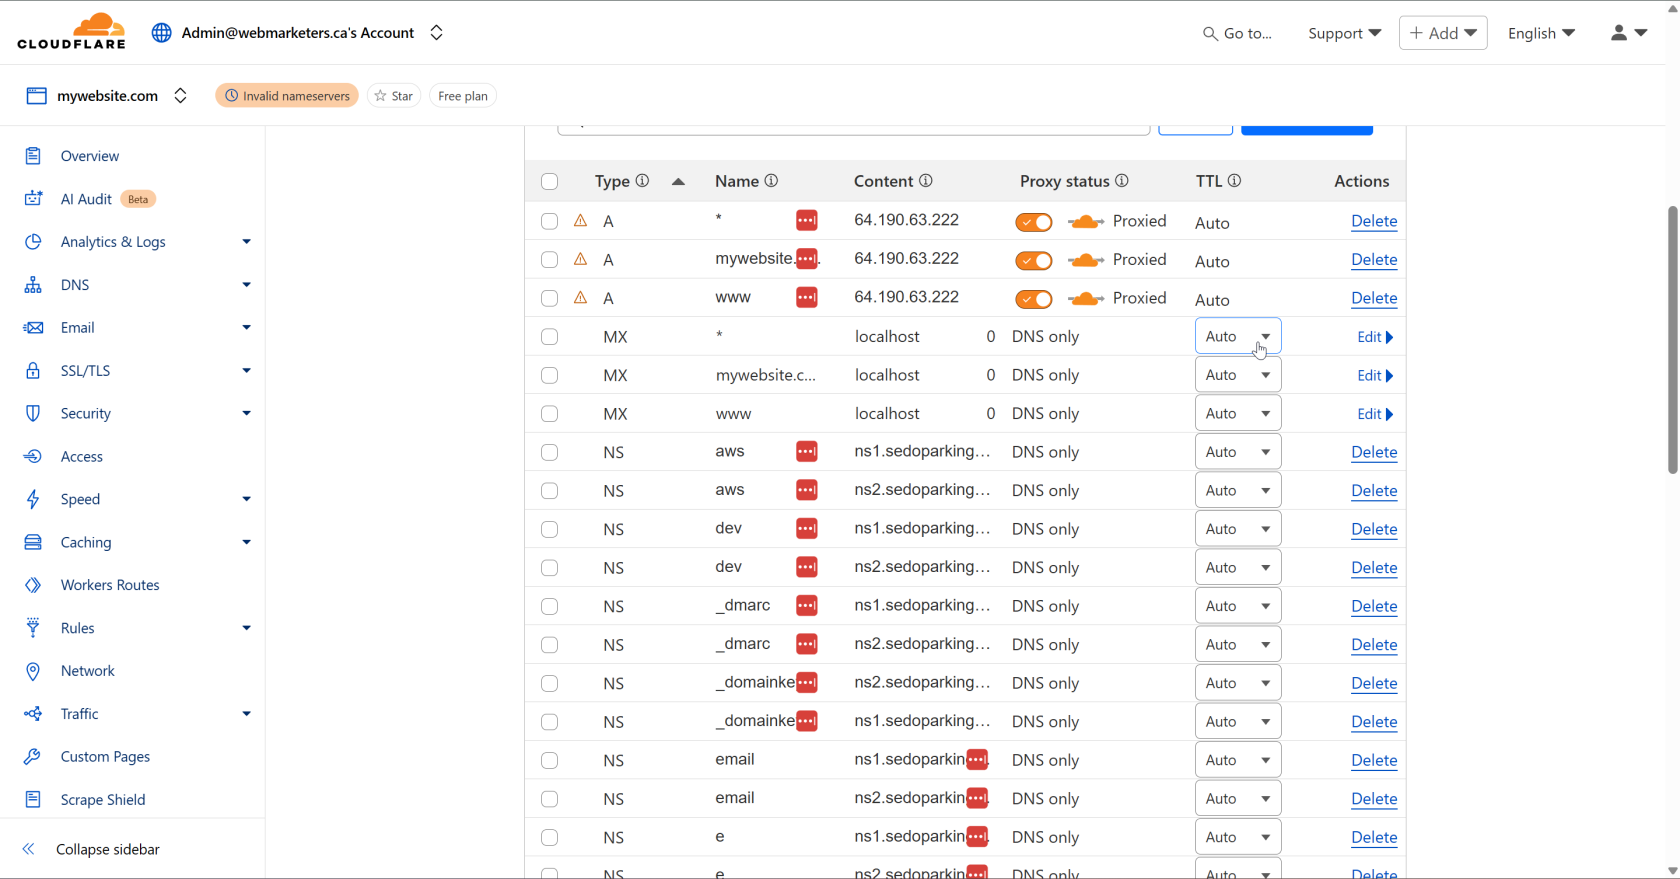](https://bookstack.webmarketersdev.ca/uploads/images/gallery/2025-04/izaimage.png) Then, turn off the proxy status for the A Records, and remove all unused NS (Nameserver) Records. These will not be needed with the switch to Cloudflare. [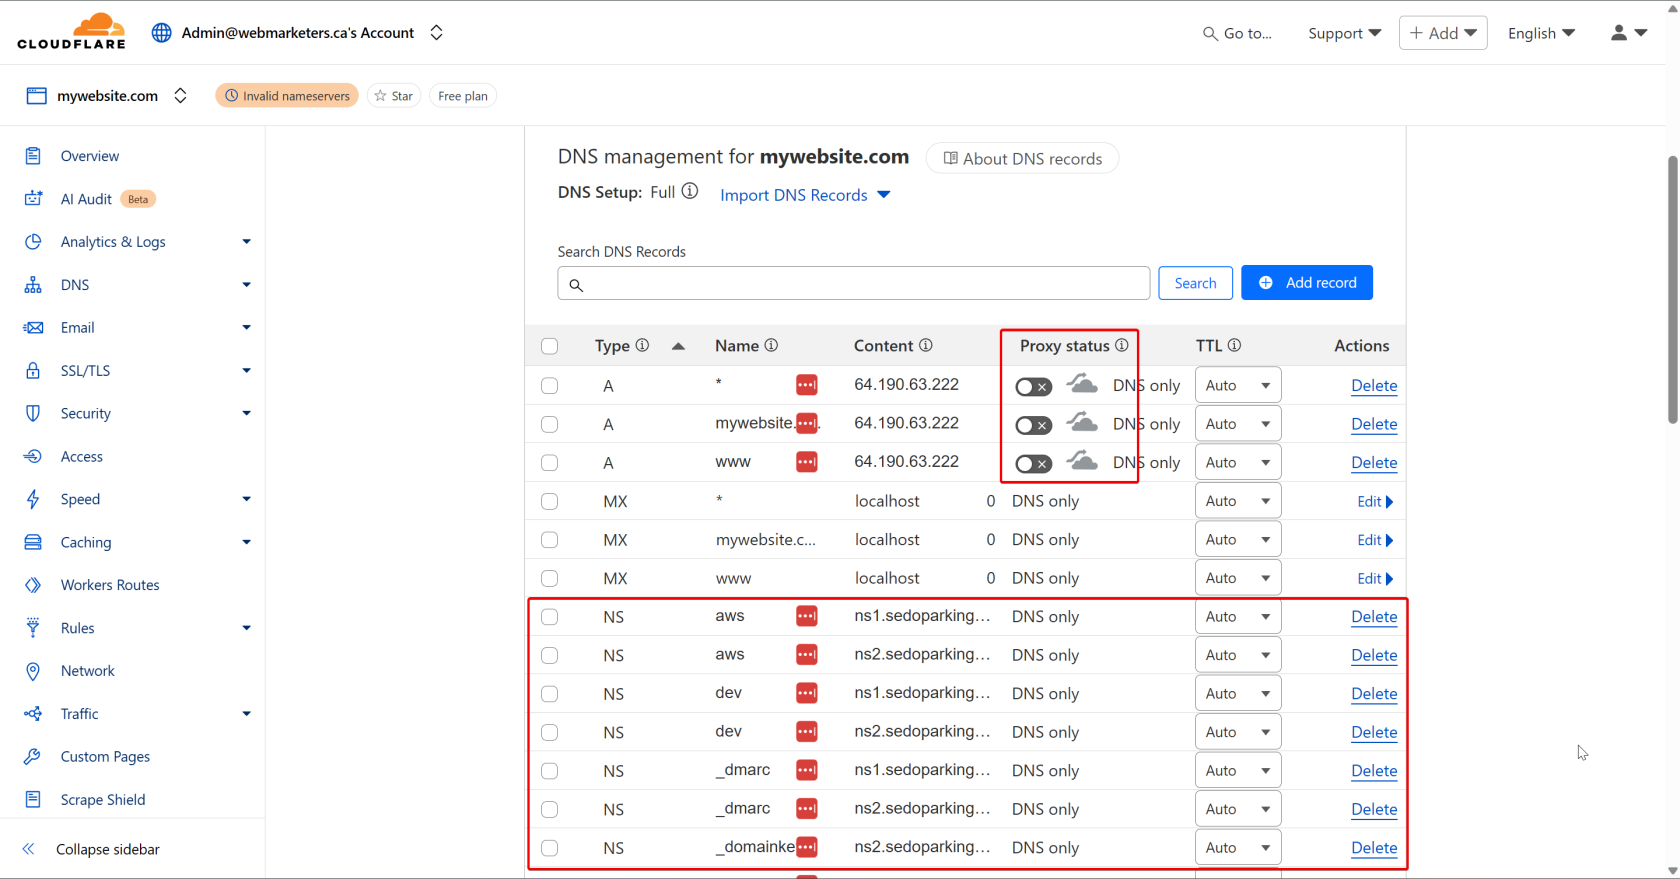](https://bookstack.webmarketersdev.ca/uploads/images/gallery/2025-04/tPbimage.png) Once this is done, click "Continue to activation". [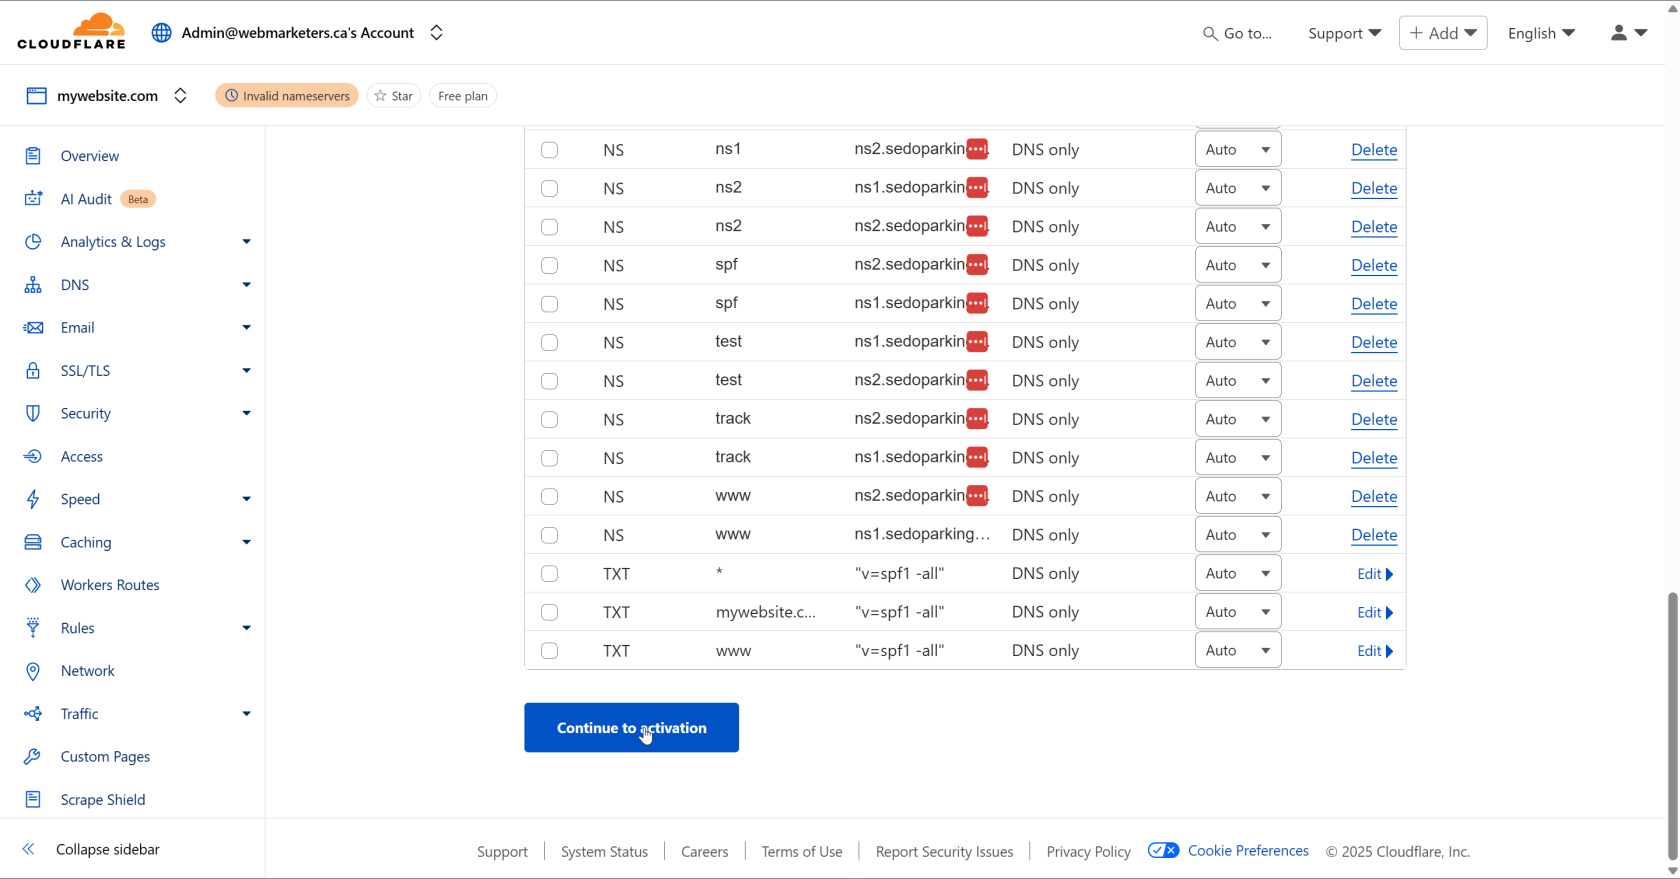](https://bookstack.webmarketersdev.ca/uploads/images/gallery/2025-04/cPjimage.png) Last but not least, login to the domain's registrar, and replace your domain's nameservers with those provided by Cloudflare.Usually, we will have **athena.ns.cloudflare.com** and **duke.ns.cloudflare.com**
Once you make the switch in the registrar, click "Continue". Cloudflare will then verify the nameservers have changed, and the DNS Zone in Cloudflare will now be in use. [](https://bookstack.webmarketersdev.ca/uploads/images/gallery/2025-04/aFhimage.png) Once the nameservers have been confirmed by Cloudflare, the DNS Zone will take effect, which means you will now have the ability to easily control DNS records for various domains in one dashboard. [](https://bookstack.webmarketersdev.ca/uploads/images/gallery/2025-04/VF7image.png) # Introduction to HTML5 Display Ads HTML5 Display Ads are dynamic, interactive advertisements built using HTML5 technology. They are designed to run seamlessly across devices and browsers, offering a rich media experience that goes beyond static images. These ads can include animations, video, and interactive elements, making them a powerful tool for engaging audiences online. ### Purpose of HTML5 Display Ads The primary goal of HTML5 Display Ads is to capture user attention and drive engagement. Whether promoting a product, service, or brand, these ads are crafted to deliver a message quickly and effectively. Their flexibility allows marketers to tailor content to specific audiences, increasing relevance and impact. #### Key purposes include: - **Brand Awareness**: Visually striking ads help reinforce brand identity. - **Lead Generation**: Interactive elements can encourage clicks and conversions. - **Retargeting**: HTML5 ads are often used in remarketing campaigns to re-engage previous visitors. - **Product Promotion**: Showcase features through animation and interactivity. ### The Purpose of Display Ads in a Comprehensive Marketing Strategy HTML5 Display Ads are a vital component of a multi-channel digital marketing strategy. They complement other tactics such as search engine marketing, social media advertising, and email campaigns by: - **Extending Reach**: Display ads appear across a wide network of websites and apps. - **Supporting Funnel Stages**: From awareness to conversion, they can be tailored to each stage. - **Enhancing Retargeting**: Personalized ads based on user behavior improve relevance. - **Driving Traffic**: Well-placed ads can direct users to landing pages or product sites. When integrated with platforms like Google Ads or Display & Video 360, HTML5 ads benefit from advanced targeting, analytics, and optimization tools. ### Limitations and Considerations While HTML5 Display Ads offer many advantages, they also come with certain limitations. #### Display Ad Limitations/Disadvantages: - **Ad Fatigue**: Users may become desensitized to repetitive ads, reducing effectiveness. - **Low Click-Through Rates**: Display ads typically have lower CTRs compared to search ads. - **Technical Constraints**: Ads must adhere to strict file size, animation length, and format guidelines to be accepted by ad networks. - **Ad Blockers**: Some users employ software that prevents display ads from appearing. - **Creative Complexity**: Designing effective HTML5 ads requires both technical and creative expertise. Understanding these limitations helps marketers set realistic expectations and optimize their campaigns accordingly. Creating effective HTML5 Display Ads requires careful planning and adherence to technical standards. Developers and designers must collaborate to ensure ads are visually compelling, performant, and compliant with platform requirements. #### Key Considerations ##### **File Size Limits** Most ad networks impose strict file size limits (often under 150 KB for initial load). Efficient asset management—such as image compression and code minification—is essential. ##### **Responsive Design** Ads should adapt to various screen sizes and resolutions. While some formats are fixed, responsive layouts improve compatibility across devices. ##### **Animation Performance** Smooth animations enhance user experience but must be optimized to avoid lag or excessive CPU usage. Make sure you are familiar with [Keyframes](https://developer.mozilla.org/en-US/docs/Web/CSS/@keyframes) and [CSS Animations](https://developer.mozilla.org/en-US/docs/Web/CSS/CSS_animations/Using_CSS_animations) before trying to animate elements. ##### **Click-Through Functionality** Ensure that click tags are properly implemented and tested. Misconfigured click actions can result in ad rejection or poor campaign performance. ##### **Ad Platform Compliance** Each platform (e.g., Google Ads, DV360) has specific requirements for ad behavior, duration, and supported features. Always validate ads against the latest [HTML5 Ad Guidelines](https://support.google.com/displayvideo/answer/10261241?hl=en). ##### **Testing and QA** Like we do on websites, ads should be tested before they go live, on every screen size exported, and every interaction. Since we're already using Google Web Designer, we can use their preview and publish options to facilitate the process. ### How to Create Your First Display Ad Start by downloading [Google Web Designer](https://webdesigner.withgoogle.com/), a free tool that simplifies ad creation with templates, animation features, and built-in click tag support. For specifics, follow the guide below. ### Quick links: - [Download Google Web Designer](https://webdesigner.withgoogle.com/) - [GWD Keyboard Shortcuts](https://support.google.com/webdesigner/answer/3187155?hl=en) - [YouTube Guide: Getting Started with GWD](https://www.youtube.com/watch?v=nwe8jABtW1g) - [HTML5 Ad Guidelines & Supported Sizes](https://support.google.com/displayvideo/answer/10261241?hl=en) - [Learn More About Display Ads](https://mailchimp.com/marketing-glossary/display-ads/) - [Sample Mockup (Figma)](https://www.figma.com/design/vMbOJH2vXzlSOeyKkARLVh/Google-Ads---Campaigner?node-id=0-1&p=f&m=dev)